
Introduction to Turkey Carving
Carving a turkey breast is an art that combines culinary skill with tradition, especially during festive occasions like Thanksgiving. The importance of mastering this technique lies not just in the aesthetics of neatly sliced turkey on a platter, but also in ensuring each slice is succulent and flavorful. A well-carved turkey breast maximizes the meat yield and enhances the overall dining experience. The process involves a series of steps, starting from selecting the right tools, positioning the turkey correctly, making precise initial cuts, and then skillfully separating the meat from the bone. This guide aims to demystify the process, providing a step-by-step approach to carve a turkey breast with finesse, ensuring that even a novice can approach this task with confidence. By understanding the nuances of turkey carving, you can transform a daunting task into an enjoyable and rewarding part of meal preparation.
Selecting the Right Tools
The success of carving a turkey breast largely depends on the tools you use. The most crucial tool is the knife. A sharp chef’s knife is often preferred for its precision and control. Its smooth blade allows for clean and smooth cuts, making it ideal for slicing through the turkey breast. On the other hand, a serrated knife, with its saw-like edge, is excellent for cutting through tougher parts and can be particularly useful if the skin is crispy or the meat is denser. Regardless of your choice, the knife must be exceptionally sharp to ensure effortless carving and to avoid shredding the meat.
Importance of a sharp knife
In addition to the knife, a sturdy cutting board is essential. It should be large enough to accommodate the turkey and have a groove around the edges to catch any juices. Finally, a pair of tongs can be invaluable. They help in steadying the turkey while you carve and can also be used for serving. Together, these tools form the basic yet essential arsenal for a successful turkey carving experience.
Initial Cuts and Separation
The journey to perfectly carved turkey breast begins with the initial cuts. Start by making a deep incision along the breastbone, guiding the knife gently but firmly. This initial cut is pivotal in defining the subsequent slices. Then, angle the knife and follow the rib cage’s contour, carefully separating the breast meat from the bone. This technique ensures you get the maximum amount of meat with minimal waste.
Tips for clean cuts:
For clean, precise cuts, maintain a steady hand and use a slicing motion rather than a sawing one. A sharp knife is your best ally here, as it glides through the meat with ease, reducing the risk of tearing or shredding. These initial steps are crucial in setting the stage for a beautifully presented turkey breast.
Carving the Turkey Breast
Carving a turkey breast is a skill that, when mastered, can significantly enhance the presentation and enjoyment of your meal. Here’s a detailed guide to help you carve with confidence and create those perfect, even slices.
Step-by-Step Carving Instructions
- Position the Turkey: Place the cooked turkey breast on the cutting board with the breast side up. Ensure it’s stable and not too hot to handle.
- Initial Cut Along the Breastbone: Start by making a long, deep cut along one side of the breastbone. Use your knife to gently feel the bone and guide your cut along its length. This initial incision is crucial as it defines the boundary for slicing the breast meat.
- Separate the Meat from the Ribcage: Angle your knife slightly and carefully slice the meat away from the ribcage. Follow the natural curve of the bones, keeping the knife close to them to maximize the meat yield. This step requires a bit of patience and a steady hand.
- Remove the Breast from the Bone: Once you have sliced along the ribcage, gently pull the breast meat away from the bone with your free hand. If needed, use your knife to make small cuts to free any meat that’s still attached.
- Slice the Breast Meat: Transfer the large piece of breast meat to a clean area of the cutting board. Hold it steady with a fork or tongs, and begin slicing it against the grain. Cutting against the grain ensures that each slice is tender and easy to chew. Aim for slices about half an inch thick for a good balance between presentation and ease of eating.
- Repeat on the Other Side: Turn the turkey around and repeat the process on the other side of the breastbone. Remember, the anatomy of the turkey is symmetrical, so the same techniques apply.
Techniques for Both Sides of the Breast
- Symmetry in Cuts: When carving the second breast, aim to mirror the thickness and angle of the slices made on the first breast. This symmetry in carving not only looks appealing but also ensures even cooking for leftovers.
- Handling the Smaller Side: Often, one side of the turkey breast is smaller or more curved. On this side, take extra care to angle your knife to follow the unique contours of the bone.
Tips for Smooth and Even Slices
- Sharp Knife is Key: A sharp knife is essential for clean cuts. It allows you to slice through the meat smoothly without applying excessive pressure, which can tear the meat.
- Use a Sawing Motion Sparingly: While a gentle sawing motion can be helpful, especially if using a serrated knife, try to minimize it. Long, smooth strokes are better for achieving even slices.
- Let the Turkey Rest: Before carving, let the turkey breast rest after cooking. This allows the juices to redistribute, making the meat moister and easier to carve.
- Thickness of Slices: Consider the occasion and your guests’ preferences when deciding on the thickness of the slices. Thinner slices are more elegant and cook faster if reheated, while thicker slices can be more satisfying and retain more moisture.
- Presentation: As you carve, arrange the slices neatly on a serving platter. Overlapping them slightly can create an attractive display that showcases the succulence of the meat.
By following these detailed instructions and tips, you’ll be able to carve your turkey breast like a pro, resulting in a beautifully presented dish that’s sure to impress your guests.
Serving Suggestions
Presentation tips:
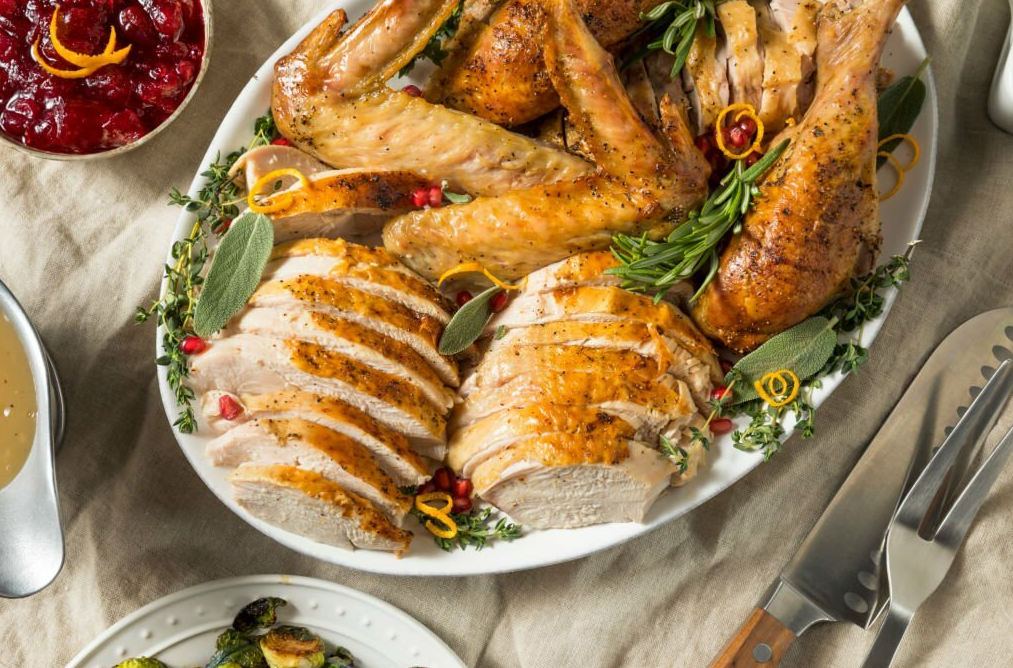
When it comes to serving carved turkey breast, presentation is key. Arranging the slices on a platter can be an art form in itself. Start by overlapping the slices in a fan-like pattern, showcasing the evenness and succulence of each piece. Garnish with fresh herbs like rosemary or thyme for a touch of elegance. For a festive touch, consider adding some colorful vegetables or cranberry sauce on the side.
Serving sizes and plating:
Serving sizes are important too. Generally, allocate about 1/2 to 3/4 pound of turkey per person. This ensures that everyone gets a satisfying portion without overwhelming the plate. When plating, balance the turkey slices with sides for a visually appealing and well-rounded meal. For inspiration on creating a harmonious plate, check out Chicken Breast Potato Recipes for Healthy Dinners, which offers great ideas for pairing proteins with vegetables.
Finally, consider the overall theme of your meal. If you’re aiming for a healthier option, smaller portions with a focus on fresh, light sides might be ideal. For more hearty meals, generous slices accompanied by richer sides like mashed potatoes or stuffing can be more appropriate. And for an alternative poultry dish that’s equally impressive, explore the Air Fryer Cornish Hens recipe, which can also benefit from your newfound carving skills.