
Preparation and Initial Steps
Carving a smoked turkey requires more than just culinary skill; it demands the right tools. The centerpiece of these tools is, undoubtedly, the knife. A carving knife is ideal due to its long, thin blade that makes precise cuts easier. For tougher joints, a chef’s knife with its broader blade can be more effective. Some prefer a serrated knife, especially for sawing through crispier skin or tougher meat sections.
Supporting tools (forks, tongs, carving board):
Beyond knives, other tools play supporting roles. A two-pronged fork is essential for steadying the turkey while you carve. It allows for better control and safety, preventing the bird from slipping. Tongs can also be useful, especially when handling hot or slippery pieces of meat. Lastly, a carving board with grooves is crucial. It collects the juices that escape during carving, keeping your workspace clean and ensuring those flavorful juices can be used later for gravies or sauces.
Selecting the right tools not only makes the carving process smoother but also enhances the presentation and flavor of your smoked turkey.
Preparing the Turkey for Carving
Letting the turkey rest:
Before carving your smoked turkey, it’s crucial to prepare it properly to ensure both safety and the best possible taste. The first step is letting the turkey rest. After removing the turkey from the smoker or oven, let it sit for about 20 to 30 minutes. This resting period allows the juices to redistribute throughout the meat, ensuring that every slice is moist and flavorful. Cutting into the turkey too soon can cause these valuable juices to run out, leading to drier meat.
Positioning the turkey:
Next is positioning the turkey for carving. Place the turkey breast-side up on a sturdy carving board, preferably one with grooves to catch any juices. Make sure the turkey is secure and won’t slip while you’re carving. If the turkey is too hot to handle, use clean kitchen towels or carving forks to maneuver it into position.
Safety tips:
Safety is paramount when carving. Always use a sharp knife, as dull knives can slip and cause accidents. Keep your fingers away from the blade, and focus on your task to avoid distractions. If you’re using an electric knife, be extra cautious and follow the manufacturer’s instructions. Remember, taking your time not only results in better slices but also ensures a safer carving experience.
Initial Cuts and Leg Removal
Making the first cuts:
The journey of carving a smoked turkey begins with the initial cuts, which set the stage for an elegant presentation. Start by positioning the turkey breast-side up on your carving board. The first cut should be along the breastbone, guiding the knife gently but firmly to separate the breast meat from the bone. This technique, detailed in How to Carve a Turkey Breast, is crucial for maximizing meat yield and ensuring even slices.
Techniques for removing legs and thighs:
Next, focus on the legs and thighs. Gently pull the leg away from the body and slice through the skin connecting the leg to the breast. This is where a sharp knife from your carving set is indispensable. Once you’ve made an incision, use your hands to bend the leg back until the joint pops out. Now, you can easily slice through the joint. For a visual guide on this process, consider watching this instructional video.
Tips for clean cuts:
For clean cuts, maintain a steady hand and use smooth, controlled strokes. Angle the knife slightly and slice the meat away from the bone, following its natural contours. If you’re interested in exploring other poultry dishes, the recipe for Air Fryer Cornish Hens on CookingMami.com offers a delightful variation.
Remember, the key to perfect leg and thigh removal lies in identifying the joints and slicing through them, not the bones. For those who prefer a different style of turkey preparation, the guide on How to Carve a Spatchcock Turkey provides an alternative method worth exploring.
Breast Carving Techniques
Carving the breast of a smoked turkey is both an art and a science. The goal is to create even, succulent slices that are as pleasing to the eye as they are to the palate. After removing the legs and thighs, turn your attention to the breast meat, the centerpiece of your turkey presentation.
Begin by making a deep cut along the breastbone. This initial incision is crucial as it guides the rest of your slicing. Position your knife at a higher angle and slice downward, parallel to the rib cage. This technique allows you to remove the entire breast in one large piece, which you can then place on your cutting board for further slicing.
Slicing the breast meat:
When slicing the breast meat, aim for uniform thickness, about 1/4 to 1/2 inch per slice. Use a long, sharp carving knife and employ a gentle sawing motion, letting the knife do the work. Avoid pressing down too hard, as this can squeeze out the precious juices that keep the meat moist.
Moisture retention is key in smoked turkey. The smoking process imparts flavor but can also dry out the meat if not carved correctly. To maintain moisture, slice the meat just before serving rather than in advance. This ensures that the juices remain within the meat, enhancing both flavor and texture.
Maintaining moisture and presentation:
Presentation is equally important. Arrange the slices neatly on a platter, slightly overlapping. If you’ve managed to keep the skin intact, place the slices skin-side up for an appealing look. The golden-brown, smoked skin adds a touch of elegance and a hint of the rich flavor that awaits.
In summary, breast carving is about precision and timing. With the right technique, you can ensure each slice of your smoked turkey is as moist and flavorful as it is visually appealing.
Advanced Carving and Serving
Wing Removal and Carving:
Removing and carving the wings of a smoked turkey requires a blend of technique and finesse. Start by locating the joint where the wing attaches to the body. Make a cut at this joint, using the tip of your carving knife to feel for the natural separation. Gently move the wing back and forth to expose the joint further, then slice through it, separating the wing from the body.
Carving wing meat effectively:
Once detached, carving the wing meat is relatively straightforward. The wing consists of two main parts – the drumette and the wingette (or flat). Slice between these two sections at the joint. The drumette resembles a small drumstick and can be served as is, while the wingette can be sliced further if desired.
The key to effective wing carving is to let the structure of the bird guide your knife. Work with the joints, not against them, to make the process smoother and to preserve the integrity of the meat.
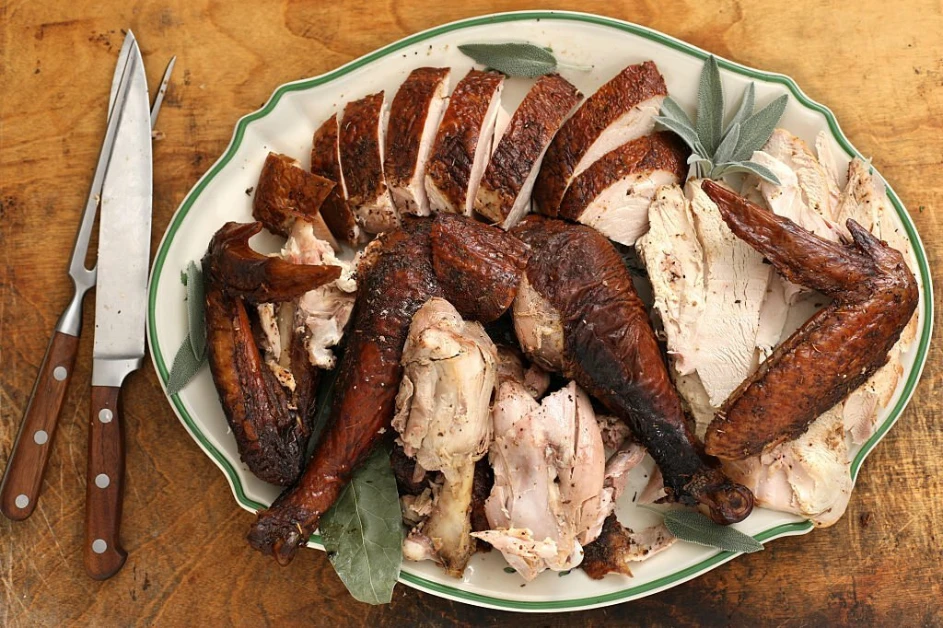
The Final Touches: Presenting Your Carved Smoked Turkey
Arranging slices on a platter:
Presentation is crucial in showcasing your carved smoked turkey. Begin by arranging the slices on a large platter. Start with the larger pieces, like the breast slices, as the base layer. Overlap them slightly for visual appeal. Then, add the legs and thighs, followed by the wing sections. If you have kept the skin intact and beautifully browned, make sure it’s facing upwards for an attractive display.
Garnishing and aesthetic tips:
Garnishing is the final step in creating an inviting presentation. Simple, fresh herbs like rosemary, thyme, or parsley can add a pop of color and a hint of rustic charm. Citrus slices, such as orange or lemon, can also be used for a fresh, vibrant look. Remember, the garnish should complement the turkey, not overwhelm it.
Aesthetic Tips for Arranging Turkey Slices
Pairing with sides and sauces:
Pairing your smoked turkey with the right sides and sauces can elevate the meal. Classic sides like mashed potatoes, stuffing, cranberry sauce, and roasted vegetables complement the rich, smoky flavor of the turkey. For sauces, a traditional gravy or a more adventurous cranberry glaze can enhance the turkey’s flavor.
When it comes to portion sizes, a general guideline is to allot about 1 to 1.5 pounds of turkey per person. This estimation accounts for the weight of bones and ensures there’s enough meat for everyone, with some leftovers.
Portion sizes and serving etiquette:
Serving etiquette plays a role in the dining experience. Serve the turkey warm, and if you’re hosting a sit-down dinner, consider plating the turkey slices with sides for each guest. For a buffet-style meal, allow guests to serve themselves, ensuring all the accompaniments are within easy reach. Remember, the key to a memorable meal is not just the food but the experience of sharing it with others.
Cleaning and Storing Leftovers
After the feast, properly storing the leftover smoked turkey is essential for safety and quality. Begin by allowing the turkey to cool down to room temperature. However, avoid leaving it out for more than two hours to prevent bacterial growth. Once cooled, carve any remaining meat off the bones. Slicing the meat into smaller pieces can aid in quicker cooling and more convenient storage.
Safe storage practices:
For storing, use airtight containers or resealable plastic bags. Place the turkey in the refrigerator, where it can be safely stored for up to four days. If you want to keep it longer, consider freezing the turkey. When frozen properly, smoked turkey can retain its quality for up to three months. For more detailed guidelines on safe food storage, the USDA’s Food Safety and Inspection Service provides comprehensive information.
Ideal Sides and Sauces for Your Carved Turkey
Pairing your expertly carved smoked turkey with the right sides and sauces can elevate your meal from delightful to unforgettable. The smoky richness of the turkey pairs beautifully with a variety of flavors, from classic to contemporary.
Sides:
- Mashed Potatoes: Creamy and buttery, mashed potatoes are a classic that never fails. They provide a comforting base that complements the smoky flavor of the turkey. For a unique twist, consider the healthy dinner recipes with chicken and potatoes on Cooking Mami, which can inspire similar side dishes for turkey.
- Stuffing: Whether you prefer traditional sage and bread stuffing or something more adventurous like a sausage and apple variation, stuffing is a must-have for its savory, herby goodness.
- Roasted Vegetables: A mix of roasted vegetables like carrots, Brussels sprouts, and parsnips adds a sweet and earthy element to balance the smokiness of the turkey.
- Green Bean Casserole: This creamy dish, with its crunchy onion topping, offers a textural contrast to the tender turkey meat.
- Sweet Potato Casserole: The sweetness of this dish, especially when topped with marshmallows or a pecan crumble, provides a delightful contrast to the savory turkey.
Sauces:
- Gravy: A rich, flavorful gravy made from the turkey drippings is essential. It enhances the turkey’s flavor and adds moisture to every bite.
- Cranberry Sauce: The tartness and slight sweetness of cranberry sauce cut through the richness of the turkey, offering a refreshing palate cleanser. For an innovative take, explore the bourbon cranberry sauce recipe on Cooking Mami.
- Mustard Sauce: For those who enjoy a bit of tang, a Dijon mustard sauce can be a zesty addition.
- BBQ Sauce: If you want to maintain the smoky theme, a sweet and tangy BBQ sauce can be a great complement.
These sides and sauces not only enhance the flavors of your smoked turkey but also add a variety of textures and tastes to your meal, making it a memorable feast.